Installation
Currently the 3.0 version of Streamsheets is only available as the premium version. Get access on our website www.cedalo.com. To get notified for the OS release, subscribe to our newsletter
Eclipse Mosquitto, Eclipse Streamsheets and the Cedalo Management Center are all available for Windows, Linux and macOS. In addition it also can be installed on a Raspberry Pi.
Installation
The easiest way to install any of Cedalos products and connected Eclipse project software individually, as a bundle or the whole platform is to use the official Docker based installer image cedalo/installer, which is available at Docker Hub.
The installer will guide you through the installation process and will allow you to select which components you want to install: Eclipse Mosquitto, Eclipse Streamsheets, the Management Center or combinations of it.
The following sections describe how to do the Docker based installation on Windows, Linux and macOS.
Windows
This section describes how to install Eclipse Mosquitto, Eclipse Streamsheets and the Management Center under Windows.
Step 1: Install Docker
If you have not yet, install Docker for Windows (see installation instructions here).
Step 2: Use the installer
For an installation under Windows use the installer image tagged with 3-win:
docker run -it -v C:\cedalo_platform:/cedalo cedalo/installer:3-win
In the following dialog you can select (using the space bar) which components should be installed:
? Select what to install › - Space to select. Return to submit
◉   Management Center for Eclipse Mosquitto
◉   Eclipse Streamsheets
◉   Eclipse Mosquitto 2.0
◯   Eclipse Mosquitto 1.6
When you have selected the components to install, press the return key, which will start the installation process. During the installation process the following files will be created within the installation directory:
C:\cedalo_platform
├── docker-compose.yml  # Docker Compose file
├── mosquitto           #
│   ├── config          # Configurations for Mosquitto
│   ├── data            # Data directory for Mosquitto
├── start.bat           # Start script
├── stop.bat            # Stop script
├── streamsheets        #
│   ├── init.json       # Configuration for Streamsheets
├── update.bat          # Update script
Step 3: Start everything
To start everything you installed, just use the start.bat file.
cd C:\cedalo_platform
start.bat
If this is the first time you start the applications, Docker will first perform several downloads (i.e., Docker images) that are required for the application to run.
Please do not close the terminal, in which you executed the start command. If you close the terminal, the applications will be stopped.
Step 4: Open the applications
When everything is installed and started correctly the applications should be available under the following URLs:
Eclipse Mosquitto: mqtt://localhost:1883
Eclipse Streamsheets Web UI: http://localhost:8081
Default Credentials: User:
adminPassword:1234. Change your password in the administration menu.Management Center Web UI: http://localhost:8088
Default Credentials: User:
cedaloPassword:mmcisawesome. Change the password in the docker-compose.yml file. Find and change this entry:
CEDALO_MC_USERNAME: cedalo
CEDALO_MC_PASSWORD: mmcisawesome
Linux
This section describes how to install Eclipse Mosquitto, Eclipse Streamsheets and the Management Center under Linux.
Step 1: Install Docker
If you have not yet, install Docker for your Linux platform (see installation instructions here). For example, Docker is available for Centos, Debian, Fedora or Ubuntu.
Step 2: Use the installer
For an installation under Linux use the installer image tagged with 3-linux:
docker run -it -v ~/cedalo_platform:/cedalo cedalo/installer:3-linux
In the following dialog you can select (using the space bar) which components should be installed:
? Select what to install › - Space to select. Return to submit
◉   Management Center for Eclipse Mosquitto
◉   Eclipse Streamsheets
◉   Eclipse Mosquitto 2.0
◯   Eclipse Mosquitto 1.6
When you have selected the components to install, press the return key, which will start the installation process. During the installation process the following files will be created within the installation directory:
~/cedalo_platform
├── docker-compose.yml  # Docker Compose file
├── mosquitto           #
│   ├── config          # Configurations for Mosquitto
│   ├── data            # Data directory for Mosquitto
├── start.sh            # Start script
├── stop.sh             # Stop script
├── streamsheets        #
│   ├── init.json       # Configuration for Streamsheets
├── update.sh           # Update script
Step 3: Start everything
To start everything you installed, just use the start.sh file.
cd ~/cedalo_platform
sh start.sh
If this is the first time you start the applications, Docker will first perform several downloads (i.e., Docker images) that are required for the application to run.
Please do not close the terminal, in which you executed the start command. If you close the terminal, the applications will be stopped.
Step 4: Open the applications
When everything is installed and started correctly the applications should be available under the following URLs:
Eclipse Mosquitto: mqtt://localhost:1883
Eclipse Streamsheets Web UI: http://localhost:8081
Default Credentials: User:
adminPassword:1234. Change your password in the administration menu.Management Center Web UI: http://localhost:8088
Default Credentials: User:
cedaloPassword:mmcisawesome. Change the password in the docker-compose.yml file. Find and change this entry:
CEDALO_MC_USERNAME: cedalo
CEDALO_MC_PASSWORD: mmcisawesome
macOS
This section describes how to install Eclipse Mosquitto, Eclipse Streamsheets and the Management Center under macOS.
Step 1: Install Docker
If you have not yet, install Docker for macOS (see installation instructions here).
Step 2: Use the installer
For an installation under macOS use the installer image tagged with 3-macos:
docker run -it -v ~/cedalo_platform:/cedalo cedalo/installer:3-macos
In the following dialog you can select (using the space bar) which components should be installed:
? Select what to install › - Space to select. Return to submit
◉   Management Center for Eclipse Mosquitto
◉   Eclipse Streamsheets
◉   Eclipse Mosquitto 2.0
◯   Eclipse Mosquitto 1.6
When you have selected the components to install, press the return key, which will start the installation process. During the installation process the following files will be created within the installation directory:
~/cedalo_platform
├── docker-compose.yml  # Docker Compose file
├── mosquitto           #
│   ├── config          # Configurations for Mosquitto
│   ├── data            # Data directory for Mosquitto
├── start.sh            # Start script
├── stop.sh             # Stop script
├── streamsheets        #
│   ├── init.json       # Configuration for Streamsheets
├── update.sh           # Update script
Step 3: Start everything
To start everything you installed, just use the start.sh file.
cd ~/cedalo_platform
sh start.sh
If this is the first time you start the applications, Docker will first perform several downloads (i.e., Docker images) that are required for the application to run.
Please do not close the terminal, in which you executed the start command. If you close the terminal, the applications will be stopped.
Step 4: Open the applications
When everything is installed and started correctly the applications should be available under the following URLs:
Eclipse Mosquitto: mqtt://localhost:1883
Eclipse Streamsheets Web UI: http://localhost:8081
Default Credentials: User:
adminPassword:1234. Change your password in the administration menu.Management Center Web UI: http://localhost:8088
Default Credentials: User:
cedaloPassword:mmcisawesome. Change the password in the docker-compose.yml file. Find and change this entry:
CEDALO_MC_USERNAME: cedalo
CEDALO_MC_PASSWORD: mmcisawesome
Raspberry Pi
This section describes how to install Eclipse Mosquitto, Eclipse Streamsheets and the Management Center on a Raspberry Pi under Raspbian. You can either manually work through all the steps below or use the script we prepared for you.
Fast Installation
Open your shell and enter the following command to start the installation process:
curl -fsSL raw.githubusercontent.com/cedalo/streamsheets-installer/master/pi-installer.sh -o get-streamsheets.sh && sh get-streamsheets.sh
This installs and starts the Cedalo platform.
Starting & Stopping
Starting Cedalo platform:
The Fast Install automatically starts the applications for the first time. To start after the Manual Install use the following commands.
Navigate into the folder “~/cedalo_platform” with your shell and enter sudo sh start.sh.
cd ~/cedalo_platform
sudo sh start.sh
Now you are able to access your applications here:
- Eclipse Mosquitto: mqtt://localhost:1883
- Eclipse Streamsheets Web UI: http://localhost:8081
- Management Center Web UI: http://localhost:8088
You are able to access the applications from anywhere in your network, by typing in the IP-adress/hostname of your Pi together with the port 8081. The standard Raspberry Pi hostname is “raspberrypi”, which results in:
Standard hostname adress: raspberrypi:8081; raspberrypi:8088
Open a browser on another computer in the same local network and type the address.
Eclipse Mosquitto: mqtt://localhost:1883
Eclipse Streamsheets Web UI: http://localhost:8081
Default Credentials: User:
adminPassword:1234. Change your password in the administration menu.Management Center Web UI: http://localhost:8088
Default Credentials: User:
cedaloPassword:mmcisawesome. Change the password in the docker-compose.yml file. Find and change this entry:
CEDALO_MC_USERNAME: cedalo
CEDALO_MC_PASSWORD: mmcisawesome
Stopping Cedalo platform:
Navigate to your shell where the application is running and simply press ctrl + c or navigate into the folder “~/cedalo_platform” with your shell and enter sudo sh stop.sh.
cd ~/cedalo_platform
sudo sh stop.sh
Manual Installation
Step 1: Install Docker
If you have not yet, install Docker for Raspbian (see installation instructions here and here) and install Docker Compose.
Step 2: Use the installer
For an installation under Raspbian use the installer image tagged with 3-rpi:
docker run -it -v ~/cedalo_platform:/cedalo cedalo/installer:3-rpi
In the following dialog you can select (using the space bar) which components should be installed:
? Select what to install › - Space to select. Return to submit
◉   Management Center for Eclipse Mosquitto
◉   Eclipse Streamsheets
◉   Eclipse Mosquitto 2.0
◯   Eclipse Mosquitto 1.6
When you have selected the components to install, press the return key, which will start the installation process. During the installation process the following files will be created within the installation directory:
~/cedalo_platform
├── docker-compose.yml  # Docker Compose file
├── mosquitto           #
│   ├── config          # Configurations for Mosquitto
│   ├── data            # Data directory for Mosquitto
├── start.sh            # Start script
├── stop.sh             # Stop script
├── streamsheets        #
│   ├── init.json       # Configuration for Streamsheets
├── update.sh           # Update script
Step 4: Open the applications
When everything is installed and started correctly the applications should be available under the following URLs:
- Eclipse Mosquitto: mqtt://localhost:1883
- Eclipse Streamsheets Web UI: http://localhost:8081
- Management Center Web UI: http://localhost:8088
If this is the first time you start the applications, Docker will first perform several downloads (i.e., Docker images) that are required for the application to run.
Please do not close the terminal, in which you executed the start command. If you close the terminal, the applications will be stopped.
Port Allocation
What are ports?
Ports handle communication over the internet, they make sure, that there are no conflicts in data transmission. All data transmitted over the internet is sent and received by using different kinds of protocols. Each protocol is assigned a specific port number. This way data streams can easily be managed and adjusted.
Which ports are allocated by Streamsheets?
Streamsheets allocate a number of ports.
These are all used ports:
- 1883 - MQTT Broker
- 1884 - Internal MQTT Broker
- 8080 - Gateway
- 8081 - Reverseproxy
- 8083 - Streams Service
- 8088 - Gateway WebSocket API
- 8090 - Gateway HTTP API
- 9000 - WebUI
- 40000-40100 - Streams Service (UDP)
- 4840 - OPC UA
- 6379 - Redis
- 27017 - Internal MongoDB
How can I change ports?
Depending on your installed version, there are different ways to adjust the ports.
Open Source:
Starting with version 1.5 of the Streamsheets open source release you
can add the port changes to the docker run command used in the
installation process:
docker run -p 8081:8081 -p 1885:1883 -v /tmp/db:/var/lib/mongodb cedalo/streamsheets:1.5
The parameter -p port:port defines the port allocation. In the example
above the 1883 port of the MQTT Broker was mapped to use the port 1885.
Add another -p port:port for every port that needs adjustment.
Streamsheets Premium
If you don´t use the open source version or have an older version, the port mapping is done via a .yml file in your Installer directory in the "docker-compose" folder. To change each port individually open the .yml file and search for the "ports" parameter of the service.
Port Mapping: The command and the .yml file always use the structure port:port to adjust ports. This is because we map internal docker ports to the ports of the host system. The port on the left represent the port of the host system and the port on the right represents the internal docker port. The one that interests you, is the one of the host system.
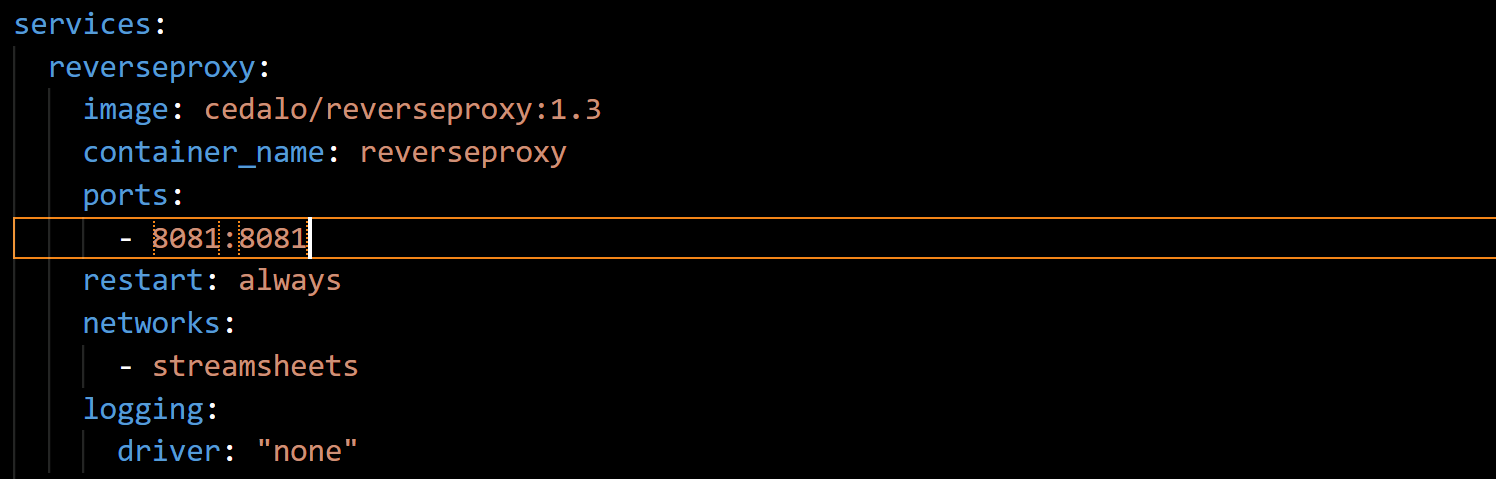
Changing the port to 8082 would look like this:
8082:8081
When do I need to change ports?
Sometimes other programs are blocking certain ports. Then you encounter error messages like this:
ERROR: for streamsheets Cannot start service streamsheets: driver failed programming external connectivity on endpoint streamsheets (3c98f65b49d5c5ad961c9fde5ef145f21bf385b5edc077e204a9b877834185be): Bind for 0.0.0.0:8083 failed: port is already allocated
Changing either the port of the Streamsheets or the port of the other program is then the only option, if you want to run both at the same time on this host system.
Eclipse Mosquitto Broker
Streamsheets comes with the MQTT Mosquitto Broker. The password will be randomly generated on installation and set once in the standard "MQTT Connector".
Find Password: Within the Streamsheets installation directory in the folder "settings" you can find the "mosquitto" folder. Open the "pw_clear.txt" file to access your password.
Change Password: To change the broker password stop Streamsheets, delete the "pw.txt" & "pw_clear.txt" file and restart again. The new password will be generated and again written into the "mosquitto" folder. Don´t forget to change the password in your Streamsheets connector!
In the premium edition, a default Account is set storing the credentials.