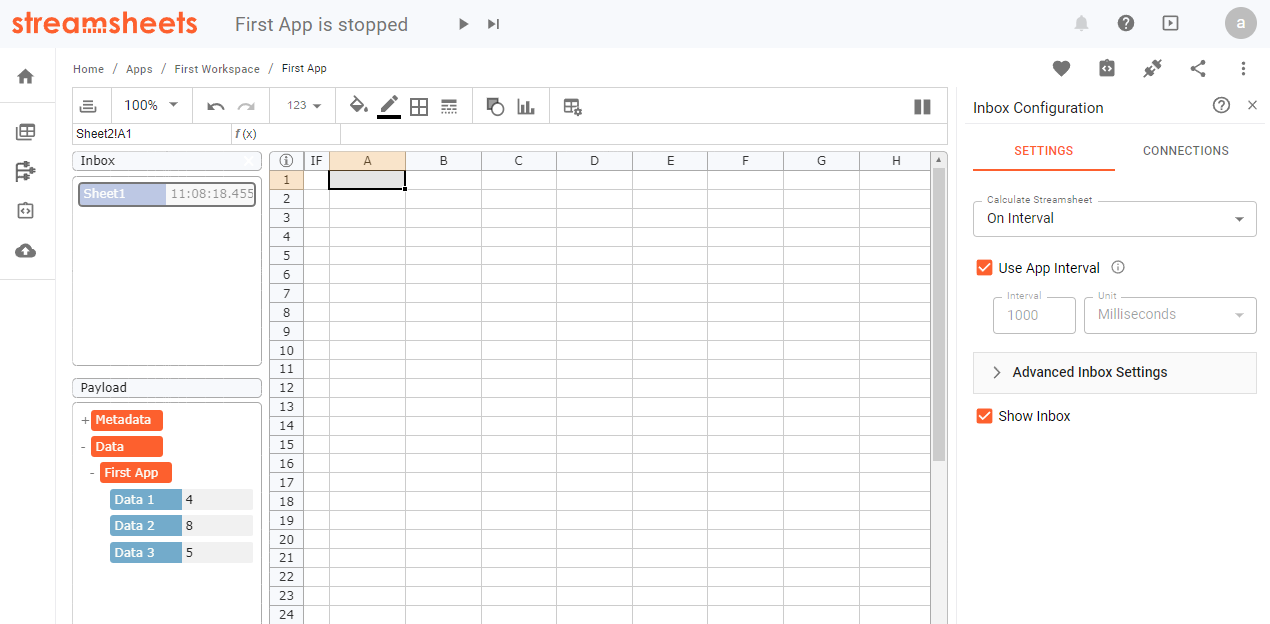
Inbox
As in a mail service, the Inbox marks the point where new messages arrive and queue in order of their arrival time before they are processed. Although the inbox only displays up to a maximum of 100 messages on your client (your browser), an unlimited amount can be queued on the server. The structure and content of a message are given in full detail and presented as a JSON object in the Payload section. Should the original data format not be JSON, the format is automatically converted.
Use drag and drop, to link some or all payload elements of incoming messages to the grid and create a READ() function. Now, every time a new message arrives, and the stream sheet is calculated, the respective cells are updated with new message data or set to #NA if a message did not deliver the given parameter.
Messages and message streams can be linked to an inbox, either via the “Inbox” settings or the “Connections” menu. Another way to insert messages into an inbox is by using it as a dedicated target in certain functions (e.g. =HTTP.GET( A1, INBOX(“Sheet1”))).
Inbox messages can consist of different objects. There are the regular parameters like boolean, number, or string elements, which are holding the actual information, and there are structural elements like "dictionaries" and "arrays". The structural elements are ordering the pieces of information in different hierarchies. While "dictionaries" only serve as folder elements to organize message data on different levels, "arrays" usually follow a certain style and represent an order list of values. They repeat the same form a certain amount of times. For example, if a message should hold different information for the same parameters an array would be a perfect choice.
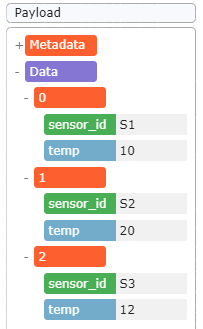
Simple example: You could structure multiple sensor information from the same parameter in one message. Let's say you have three sensors, who all measured temperature: Sensor 1 measured 10°C, Sensor 2 measured 20°C and Sensor 3 measured 12°C.
A JSON object capturing this information would look like this:
[{
    "sensor_id":"S1",
    "temp":10
}, {
    "sensor_id":"S2",
    "temp":20
}, {
    "sensor_id":"S3",
    "temp":12
}]
In a Streamsheets Inbox the same payload would look like this:
Inbox Settings
In this menu, you decide the connections a stream sheet consumes. Also, it sets its recalculation trigger.
Settings:
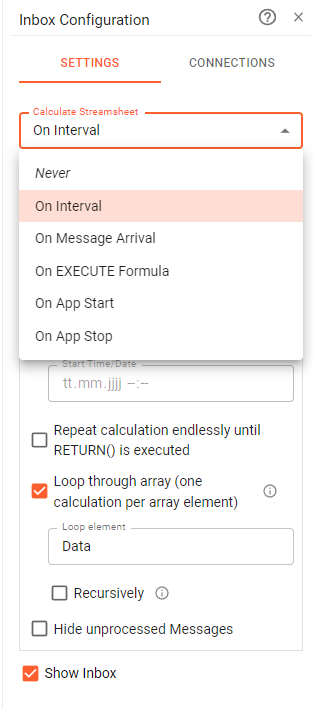
There are multiple possible triggers for a calculation step to choose from. In the dropdown menu “Calculate Streamsheet” you can find the following options.
- “Never”: The Streamsheet is never recalculated.
- “On Interval”: A sheet-specific interval can be set to recalculate the sheet cyclically. You can either decide to use the globally set interval or choose an individual interval.
- In the advanced settings, it is further possible to select a specific calculation starting point for the intervals.
- “On Message Arrival”: Every time a message is received, the sheet is calculated immediately.
- “On EXECUTE Formula”: The calculation of a stream sheet is triggered by another stream sheet containing an EXECUTE formula. The triggering sheet must be in the same App. Note: The sheet triggering the execution will pause its calculation in the cell containing EXECUTE, wait until the triggered sheet has completed its calculation, and then resume its calculation.
- “On App Start”: The streamsheet calculates once when the App is started.
- “On App Stop”: The streamsheet calculates when the App is being stopped.
It is possible, that messages queue in your inbox. Make sure, that you adjust your trigger to not overcrowd your queue if you are not using “on message arrival” as a trigger.
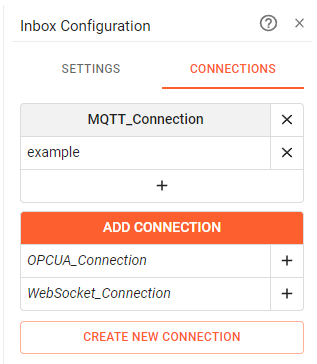
Connections:
An inbox can have one or multiple connections. A connection is always based on an underlining protocol and the connection's details. This could be for example an MQTT broker with a topic to listen to. Incoming messages will now be redirected to the selected inbox and will be evaluated in the next calculation step.
By clicking “Create new connection” you will be redirected to the “Connections” menu.
Advanced Settings:
- Loop through an array (one calculation per array element):Sometimes it makes sense to calculate the contents of a payload one at a time, because it consists out of arrays with different amounts of objects. This can be done by adding a loop element to your inbox. Either right-click on a parameter of your payload or open the inbox settings and set it via using the DOT notation. When looping an array, every array object gets treated as if it would be part of a single message. Usually, one message takes one step to be processed. Adding a loop to our example message would now result in three steps. In every step, only one of the three information blocks would be read. There are two main reasons, why this seems practical. The array is filled with messages you want to process one after another. The array varies in size, and you never know how big an array could get. So adding simple READ() functions does not cut it. Adding a loop element is quite simple. Wait for one message to arrive in the inbox, right-click on the top array element and select "Set Loop Element". It is also possible to set the loop element in the Inbox settings. There you can also add the option "recursively" if you do not just want to loop through an array, but want to loop through more than just one level of an "array" or even "dictionary" object.

- „Hide unprocessed Messages”: If this option is checked, a queue of messages is not displayed in the inbox. Only the next message to be processed is displayed.
- “Repeat calculation endlessly until RETURN() is executed”: Expects a RETURN() function to be processed.